Developer Account Setup for First-Time iOS and Android Publishers
Set up separate developer accounts on Apple and Google before building to avoid launch delays.
Publishing an AI-built app to the App Store and Google Play without owning a Mac or installing Xcode means having your builder handle the required iOS build and signing workflow. For publishing from a Windows PC, this guide explains the enrollment, testing, and compliance work that must run in parallel with meeting those requirements and setting up developer accounts to keep either store from holding up your launch.
Why Apple and Google store accounts are not interchangeable, and what that means before you build anything
Apple and Google run separate enrollment systems. Apple charges a membership fee each year, while Google Play charges a one-time $25 fee to register. Their identity checks and release gates differ too, so completing one account does not prepare you to publish through the other.
Apple’s signing infrastructure, review process, and privacy requirements make iOS the more technically demanding path for newcomers in 2025–2026. Google adds a different wait because new personal accounts must go through closed testing. If business paperwork is missing or nobody is ready to test, it can take weeks before review starts. The sections below follow each track in order so that both can be planned together.
How the Apple Developer Program enrollment works, and which account type to choose before paying anything
The first decision is whose name should appear as the seller. Individual enrollment uses your personal legal name and typically clears verification within a day, sometimes up to two. It is the simplest route for a solo founder publishing under their own name. Organization enrollment displays the company or studio name instead, but requires Apple to verify the legal entity separately from the person applying.
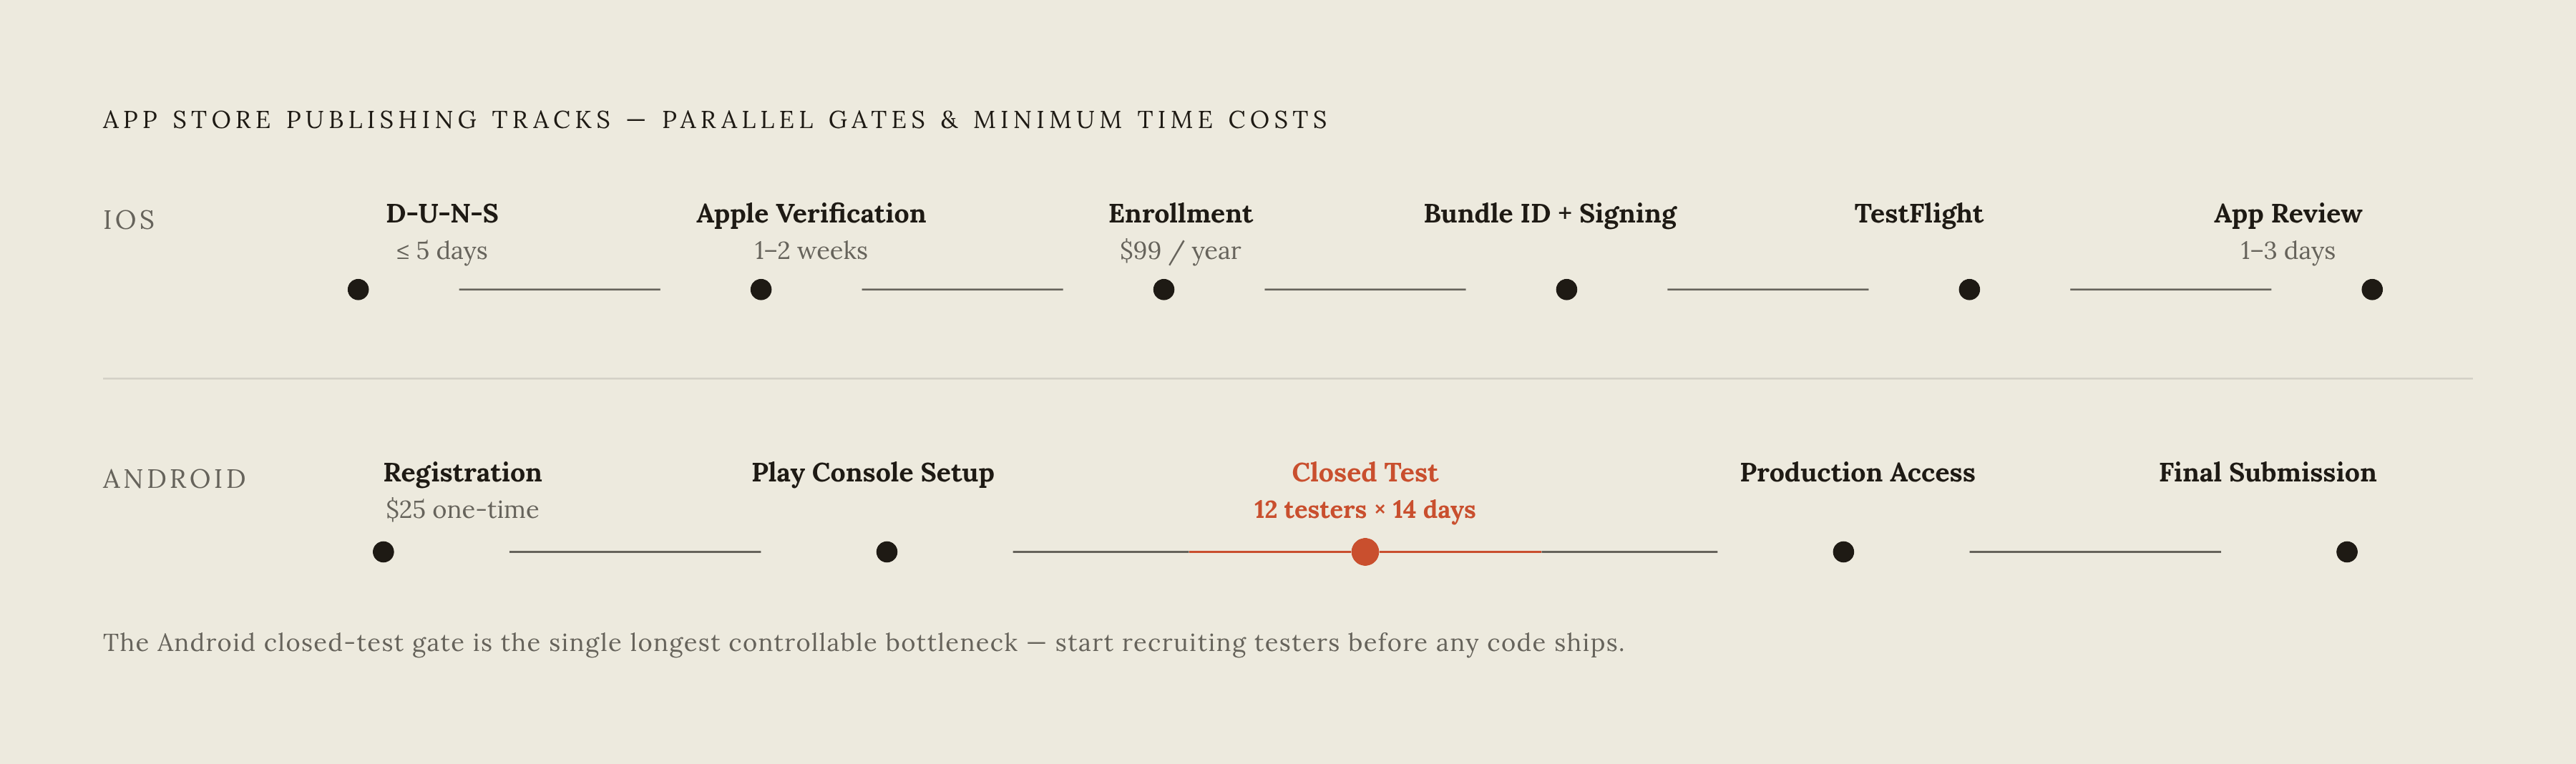
That business identity adds a paperwork dependency. Organization applicants need a D-U-N-S number from Dun & Bradstreet. Applying is free, but receiving the number can take up to 5 business days, followed by up to 2 more business days for Apple to receive it. Organization verification then takes one to two weeks once the number is active. If this route applies, request the number before the development sprint.
Payment comes after that choice. A free Apple Developer account, created by signing in with an Apple ID and accepting the Developer Agreement, supports on-device testing through Xcode but cannot distribute through the App Store. The paid membership costs $99/year and includes TestFlight, App Store Connect, signing certificates, provisioning profiles, CloudKit, push notifications, and developer documentation. A lapsed membership removes apps from sale, and the enrollment Apple ID must have two-factor authentication enabled. The program for internal distribution has a higher annual fee and does not support App Store publishing.
What Apple now requires inside the app itself before a submission can pass review
Enrollment does not make a build submission-ready. Apple has required a privacy manifest since May 2024, and builds that use required-reason APIs without valid declarations are automatically rejected before a person reviews them. The manifest declares collected data, privacy-sensitive APIs, and the reasons for using them. Third-party SDKs and libraries need their own manifest entries too, because Apple checks that layer as well.
Required Reason APIs include file timestamps, system boot time, disk space, active keyboard state, and user defaults. Missing declarations are among the common rejection causes in 2025–2026. Under Apple’s November 2025 guidelines update, an app that makes or shows AI-generated content must also tell users clearly that it does so.
The build toolchain is another hard gate. Apple requires the build, archive, and export workflow to use Xcode 26 or later. New submissions also face a formal minimum deployment target in 2026, while active device distribution makes a more recent iOS version the practical floor. The app icon must be a 1024×1024 PNG without transparency or rounded corners, from which Xcode generates the required sizes. A publicly accessible privacy policy URL is required even if the app collects no data.
For a founder using a no-code or AI-assisted builder, the lesson is to verify that the builder handles these requirements before submitting. Not installing Xcode yourself changes who performs the build. It does not exempt the resulting app from Apple’s checks.
The iOS submission sequence from App Store Connect setup through App Review
First, go to Certificates, Identifiers & Profiles in the Apple Developer portal and register a unique bundle identifier. It uses reverse-DNS format, such as com.yourcompany.appname, and connects the binary, signing setup, and store listing. Choose it carefully before the first upload. Once a build has been uploaded, the identifier cannot be renamed.
Second, make a distribution certificate and an App Store provisioning profile. Xcode’s “Automatically manage signing” option is the recommended path for first-time solo developers, while manual setup is needed for CI/CD pipelines. The private key lives in the system’s credential store. If the private key is lost and there is no backup .p12 export, the certificate must be revoked, which makes the existing profiles invalid.
Third, create the app record in App Store Connect with the name, primary language, bundle identifier, and SKU. The name allows up to 30 characters. This creates a listing shell. Fourth, prepare screenshots and the name, subtitle, description, keywords, support URL, privacy policy URL, age rating, and App Privacy answers. Keywords have a 100-character limit and are comma-separated.
The App Privacy questionnaire produces the privacy nutrition label shown on the product page. Its answers must match the PrivacyInfo.xcprivacy file inside the binary. Fifth, use Xcode’s App Store Connect distribution workflow to build, archive, and upload the release. Every upload needs a higher build number than the previous one.
Sixth, run a round of TestFlight testing, which is optional but strongly recommended. Processing typically takes a short wait, up to about an hour in normal conditions. Internal testers get access instantly, while external testers need a one-time beta review, usually under a day. TestFlight builds expire after a fixed period. A crash caught here avoids the rejection and restarted review clock that the same crash could cause later.
Seventh, complete the App Review questionnaire and submit. Publishers most often overlook the need for a working demo account when any feature requires authentication. Without credentials, reviewers cannot test and will reject the submission. Review Notes should explain unusual inputs, give context for entitlements that need it, or tell reviewers how to test an in-app purchase. Export compliance and content rights also need confirmation.
A straightforward App Review takes between one and three days, but the first release needs at least one full business week overall. Organization enrollment or special entitlements can extend that window. Reserve several days after first submission for fixes rather than treating the first review decision as a guaranteed launch date.
How Google Play enrollment differs, and the closed-testing requirement that blindsides solo founders
Google Play’s one-time fee makes signing up look easier. A personal account uses the individual’s name and identity, while an organization account requires business verification. The consequential distinction is testing access. New personal accounts face the 12-tester closed-testing gate, whereas organization accounts do not.
That gate requires 12 opted-in testers for 14 consecutive days. Closed testing cannot begin until app setup in the Play Console is complete, so opening an account does not start the clock. Continuity is measured for each tester. Someone who opts out and comes back must start their own streak of days again, and if fewer than 12 testers have the required streak, the full window is broken.
For a solo founder, this is a distribution problem before distribution is available. Finding enough people is only the start. They must remain opted in through the required period, which is difficult without an existing community. Even with the app finished on day one, a new personal account cannot realistically reach production for roughly three weeks minimum.
There is also a physical-device requirement to plan around. People with new personal accounts must use the Play Console mobile app to prove they have access to a real Android device. A founder expecting to work entirely from a Windows browser still needs that access. Avoiding a local iOS development setup does not make the whole publishing process desktop-only.
Google Play store listing requirements and what the Play Console needs before a submission can proceed
Google Play blocks missing or oversized listing assets before review. The app name allows 30 characters, the short description allows 80, and the full description allows up to 4,000. Preparing that copy before opening the console avoids repeated stops to shorten or rewrite it. The limits apply to separate fields.
The visual assets have their own specifications. Google requires a 512×512 pixel PNG app icon within its maximum file size, a 1,024×500 pixel feature graphic, and at least two screenshots. Where the console asks about AI-generated or AI-edited store assets, those assets must be declared. The privacy policy must be publicly hosted, and the content rating questionnaire must be complete before submission so that the app receives its age rating.
New Android submissions must target a current API level, and that requirement advances with major Android releases. For founders using an AI-assisted builder, the action is to confirm the current Play Console requirement with the builder before submission. A builder that does not update its build targets can leave an otherwise prepared release unable to proceed.
The compliance requirements both platforms now share, and why the AI content era made them converge
Apple’s November 2025 guidelines update formalized disclosure requirements for sharing personal data with third-party AI. An app can be removed if it is found to break those rules after approval. Google’s console asks publishers to say which listing assets are AI-generated or AI-edited. The rules cover different uses of AI, so the same disclosure will not work for both stores.
Google asks how data is handled in the Play Console’s Data Safety section, while Apple has a questionnaire for the listing and a separate manifest inside the app. The distinction is important for an AI-built app. A builder’s technical output and the publisher’s store answers are separate parts of the submission, and inconsistencies can trigger rejection on either platform.
A founder should check that the builder provides what the binary needs, including the iOS privacy manifest, and write the answers for the store listing themselves. Those answers and the privacy policy need to be ready before submission. Both platforms require the public policy even when there is no data collection to disclose.
How can you publish to both stores without a Mac or Xcode while keeping neither track blocked?
A founder taking that route should check what the builder handles for builds and signing as they start getting the accounts ready. The first day’s work is mostly administrative. If publishing under a business name on iOS, request the D-U-N-S number immediately and create a dedicated Apple ID with two-factor authentication. If using a personal Google Play account, find testers before app setup is done. Prepare the privacy policy and host it at a stable HTTPS URL.
During the build, the two tracks can advance together. Apple enrollment leads into bundle registration, signing configuration, the App Store Connect listing, TestFlight, and App Review. Google registration leads into app setup, the configured closed test, the 14-day period, and the application for production access before final submission. Apple’s business verification and Google’s testing window need not happen back to back. But the Google clock can start only once app setup is done and the testers are ready.
First submissions frequently return with requests for more information or minor fixes, so reserve several days after each one. The combined store-account cost starts at $99/year for Apple plus Google Play’s one-time $25. The larger avoidable expense is time lost because enrollment, testing, or compliance began only after the app was finished.